前言
做 Java Web 开发的你,一定听说过SpringMVC的大名,作为现在运用最广泛的Java框架,它到目前为止依然保持着强大的活力和广泛的用户群。
本文介绍如何用eclipse一步一步搭建SpringMVC的最小系统,所谓最小系统,就是足以使项目在SpringMVC框架下成功跑起来,并且能够做一些简单的事情(比如访问页面)的系统。
话不多说,让我们开始吧。所有的源代码和jar包都会在最后给出。
其他环境:
操作系统:Windos 10
Tomcat : v7.0
JDK : 1.7
正文
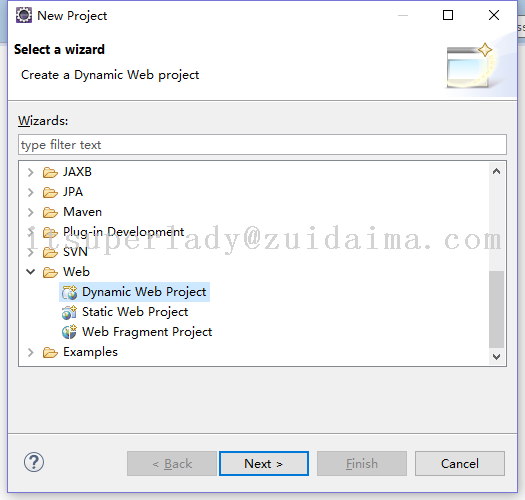
1. 新建一个项目
Paste_Image.png
我们用eclipse新建项目,选择Dynamic Web Project(动态的Web项目)。
点击Next

Paste_Image.png
Project name里面写上 springmvc,这就是我们项目的名称,其他不用改,直接点击Finish 。

Paste_Image.png
OK,项目就建好了。
接下来一定要将项目的字符集改为UTF-8
右键项目——properties
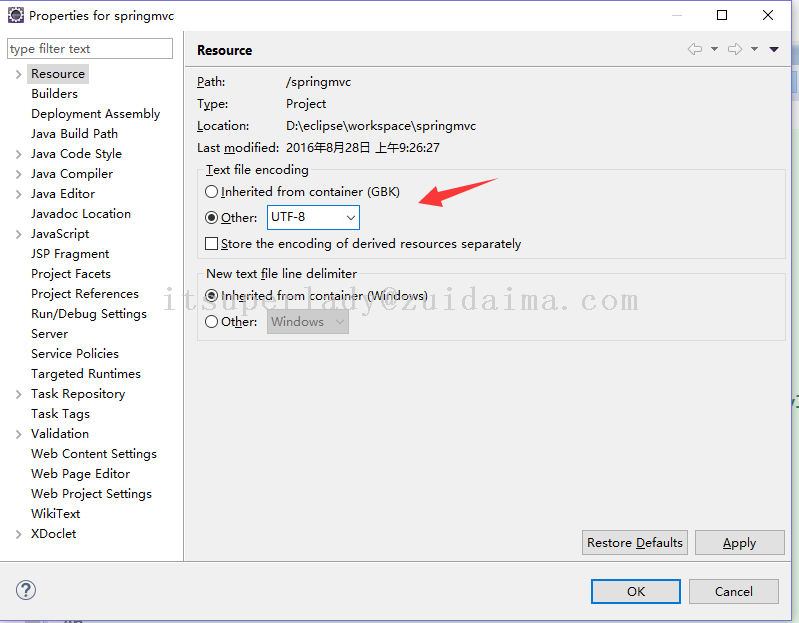
Paste_Image.png
改为UTF-8,点击OK。
2. 编写 web.xml
当我们打开WebContent/WEB-INF目录的时候,发现里面只有一个lib目录,这是存放各种jar包的地方。我们知道一个web项目必须要有一个web.xml文件才行。
既然没有,我们自己写一个咯。
右键WEB-INF——new——file,新建一个web.xml文件。
点击Finish
将以下内容填进去即可。
<?xml version="1.0" encoding="UTF-8"?>
<web-app xmlns:xsi="http://www.w3.org/2001/XMLSchema-instance"
            xmlns="http://xmlns.jcp.org/xml/ns/javaee"
            xsi:schemaLocation="http://xmlns.jcp.org/xml/ns/javaee http://xmlns.jcp.org/xml/ns/javaee/web-app_3_1.xsd"
            id="WebApp_ID">

<!-- 这是项目的名称 -->
<display-name>springmvc</display-name>


</web-app>
这样就完成了基本的配置,我的意思是说,现在这个项目就已经是一个标准的web项目了。
3. 验证web项目是否搭建成功
为了验证到目前为止的正确性,我们在WebContent目录下面新建一个jsp文件。
名字就叫index.jsp

Paste_Image.png
内容如下:
<%@ page language="java" contentType="text/html; charset=UTF-8" pageEncoding="UTF-8"%>
<html>
    <head>
        <meta charset="UTF-8" />
    </head>
    <body>
        恭喜,web項目已經成功搭建!
    </body>
</html>
我们现在就将这个项目部署到Tomcat,来验证是否可以跑起来。
在项目上右键——Debug As——Debug on Server
直接点击Finish
经过一段时间,控制台开始打印日志信息,当我们看到这些信息的时候,说明Tomcat已经启动完毕了。

Paste_Image.png
让我们打开浏览器,在地址栏输入以下信息
http://localhost:8088/springmvc/index.jsp
我电脑上Tomcat配置的端口号是8088,具体情况视你自己的Tomcat决定,可能是8080等。

Paste_Image.png
可见,能够成功访问页面了,这说明我们到目前为止的操作是正确的。
3. 集成SpringMVC
我们在web.xml文件里面添加下面的配置
3.1 配置监听器
<listener>
    <listener-class>org.springframework.web.context.ContextLoaderListener</listener-class>
</listener>

<listener>
    <listener-class>org.springframework.web.util.IntrospectorCleanupListener</listener-class>
</listener>
3.2 配置过滤器,解决POST乱码问题
<filter>
    <filter-name>encoding</filter-name>
    <filter-class>org.springframework.web.filter.CharacterEncodingFilter</filter-class>
    <init-param>
        <param-name>encoding</param-name>
        <param-value>UTF-8</param-value>
    </init-param>
</filter>

<filter-mapping>
    <filter-name>encoding</filter-name>
    <url-pattern>/*</url-pattern>
</filter-mapping>
3.3 配置SpringMVC分发器,拦截所有请求
<servlet>
     <servlet-name>springmvc</servlet-name>
     <servlet-class>org.springframework.web.servlet.DispatcherServlet</servlet-class>
     <init-param>
         <param-name>namespace</param-name>
         <param-value>dispatcher-servlet</param-value>
     </init-param>
</servlet>

<servlet-mapping>
     <servlet-name>springmvc</servlet-name>
     <url-pattern>/</url-pattern>
 </servlet-mapping>
在这个配置中,我们规定了 DispatcherServlet 的关联 XML 文件名称叫做 dispatcher-servlet。
注意,这里的路径是相对于web.xml来说的,也就是说,这个文件也在WEB-INF的根目录下。
所以,我们需要在WEB-INF的根目录下新建一个dispatcher-servlet.xml文件。

Paste_Image.png
至此,web.xml文件的编写就告一段落了。
3.4 编写dispatcher-servlet.xml
dispatcher-servlet.xml 的作用就是配置SpringMVC分发器。
配置如下:
<?xml version="1.0" encoding="UTF-8" ?>
<beans xmlns="http://www.springframework.org/schema/beans"
    xmlns:xsi="http://www.w3.org/2001/XMLSchema-instance"
    xmlns:p="http://www.springframework.org/schema/p"
    xmlns:context="http://www.springframework.org/schema/context"
    xmlns:util="http://www.springframework.org/schema/util"
    xmlns:mvc="http://www.springframework.org/schema/mvc"
    xsi:schemaLocation="http://www.springframework.org/schema/beans
       http://www.springframework.org/schema/beans/spring-beans-3.0.xsd
       http://www.springframework.org/schema/context
       http://www.springframework.org/schema/context/spring-context-3.0.xsd
       http://www.springframework.org/schema/util
       http://www.springframework.org/schema/util/spring-util-3.0.xsd
       http://www.springframework.org/schema/mvc
       http://www.springframework.org/schema/mvc/spring-mvc.xsd
      ">

         <!-- 开启注解模式驱动 -->
         <mvc:annotation-driven></mvc:annotation-driven>
         <!-- 扫包 -->
         <context:component-scan base-package="com.springmvc.*"></context:component-scan>
         <!-- 静态资源过滤 -->
         <mvc:resources location="/resources/" mapping="/resources/**"/>


         <!-- 视图渲染 jsp/freemaker/velocity-->
         <bean class="org.springframework.web.servlet.view.InternalResourceViewResolver">
               <!-- 制定页面存放的路径 -->
               <property name="prefix" value="/WEB-INF/pages"></property>
               <!-- 文件的后缀 -->
               <property name="suffix" value=".jsp"></property>
         </bean>

</beans>
根据配置,有三个需要注意的地方。
-
它会扫描 com.springmvc 包下所有的Java类,但凡是遇到有注解的,比如@Controller , @Service , @Autowired ,就会将它们加入到Spring的bean工厂里面去。
-
所有的静态资源文件,比如说 js , css , images 都需要放在/resources目录下,这个目录现在我们还没有建。
-
所有的展示页面,比如jsp文件,都需要放置在/WEB-INF/pages目录下,这个目录现在我们也没有建。
OK,我们把对应的目录加上。
首先是Java文件的目录。

Paste_Image.png
我们在这个地方右键,新建一个 com 包,再在里面建一个 springmvc 包,或者用 . 的方式一起建。

Paste_Image.png
点击Finish

Paste_Image.png
根据SpringMVC的分层,我们在springmvc 包下面建三个包,分别是controller , service , dao

Paste_Image.png
这样的话, 当我们项目一旦启动,springmvc就会扫描这三个包,将里面但凡是有注解的类都提取起来,放进Spring容器(或者说Spring的bean工厂),借由Spring容器来统一管理。这也就是你从来没有去new一个Controller的原因。
接下来,我们来建静态资源的目录。
在WebContent目录下新建一个resources文件夹。
然后顺便把js,css,img的文件夹都建一下,这里就存放我们的静态资源文件。

Paste_Image.png
最后,我们在WEB-INF目录下建一个pages文件夹,作为展示页面的存放目录。

Paste_Image.png
将之前的index.jsp拷贝进来。

Paste_Image.png
这样就配置的差不多了。
5. 导包和验证
我们将jar包放到lib目录:

Paste_Image.png
然后启动项目,验证一下到目前为止的构建是否正确。
打开Servers视图,点击如图像是甲虫一样的图标。

Paste_Image.png
发现报错了,错误信息如下:

Paste_Image.png
错误:
Could not open ServletContext resource [/WEB-INF/applicationContext.xml]
它说我们在WEB-INF下面少了一个applicationContext.xml 这个文件,原来,我们少了对SpringBean工厂的配置,它的意思就是说,我们要规定一下,在Spring容器启动的时候,需要自动加载哪些东西?
于是,我们把 applicationContext.xml 加上。

Paste_Image.png
<?xml version="1.0" encoding="UTF-8"?>
<beans xmlns="http://www.springframework.org/schema/beans"
    xmlns:xsi="http://www.w3.org/2001/XMLSchema-instance" xmlns:aop="http://www.springframework.org/schema/aop"
    xmlns:context="http://www.springframework.org/schema/context" xmlns:tx="http://www.springframework.org/schema/tx"
    xmlns:util="http://www.springframework.org/schema/util" xmlns:p="http://www.springframework.org/schema/p"
    xsi:schemaLocation="http://www.springframework.org/schema/beans
  http://www.springframework.org/schema/beans/spring-beans.xsd
  http://www.springframework.org/schema/aop
  http://www.springframework.org/schema/aop/spring-aop-4.0.xsd
  http://www.springframework.org/schema/tx
  http://www.springframework.org/schema/tx/spring-tx-4.0.xsd
  http://www.springframework.org/schema/context
  http://www.springframework.org/schema/context/spring-context-4.0.xsd
  http://www.springframework.org/schema/util
  http://www.springframework.org/schema/util/spring-util-4.0.xsd
  ">

</beans>
里面我们啥也不配置,再次启动Tomcat。

Paste_Image.png
这回不报错了。
5. 配置ViewController
我们知道,WEB-INF目录下的任何资源都是无法直接通过浏览器的url地址去访问的,保证了安全性。这也是我们为什么把页面都放在该目录下的原因。
为了有所区分,我们还单独建立了一个pages文件夹,将这些页面保存起来。

Paste_Image.png
现在,为了访问这个页面,我们需要用到SpringMVC的页面跳转机制。
我们在Controller包下新建一个ViewController

Paste_Image.png
点击Finish

Paste_Image.png
ViewController 代码:
package com.springmvc.controller;
import javax.servlet.http.HttpServletRequest;
import org.springframework.stereotype.Controller;
import org.springframework.web.bind.annotation.RequestMapping;
import org.springframework.web.servlet.ModelAndView;

@Controller
public class ViewController {

    @RequestMapping("/view")
    public ModelAndView view(HttpServletRequest request){
        String path = request.getParameter("path") + "";
        ModelAndView mav = new ModelAndView();
        mav.setViewName(path);
        return mav;
    }
}
我只需要将想要访问的页面放在path里面,通过url传进来就行了。
因为添加了java类,因此我们重新启动Tomcat。
启动完成后,在地址栏输入:
http://localhost:8088/springmvc/view?path=index
结果:

Paste_Image.png
没关系,我们看他报什么错。
message /springmvc/WEB-INF/pagesindex.jsp
pagesindex.jsp是什么鬼??
原来,在dispatcher-servlet.xml中,我们少写了一个 "/"

Paste_Image.png
添上去就行了。

Paste_Image.png
保存后,因为修改了XML配置文件,因此我们还是需要重新启动Tomcat。
启动完成后,继续!

Paste_Image.png
成功了。
6. 引入静态资源
比如,我在resources/img目录下放了一张图片,怎么引入到index.jsp呢?

Paste_Image.png
background : url(http://localhost:8088/springmvc/resources/img/bg.jpg);
background-size : 100% 100%;
的确,这是一种方式。可是,它有一个缺点就是根路径写死了,我们肯定不希望这样的。
其实,我们可以在viewController里面拿到项目根路径,然后传递到jsp页面就OK了。

Paste_Image.png
我们把调试信息 “恭喜,web項目已經成功搭建!” 删掉。
<%@ page language="java" contentType="text/html; charset=UTF-8" pageEncoding="UTF-8"%>
<html>
    <head>
        <meta charset="UTF-8" />
    </head>

    <style>
        body {
            background : url(${contextPath}/resources/img/bg.jpg);
            background-size : 100% 100%;
        }
    </style>
    <body>

    </body>
</html>
${contextPath} 可以取到Controller传过来的contextPath值。
成功了!

 最近浏览
最近浏览